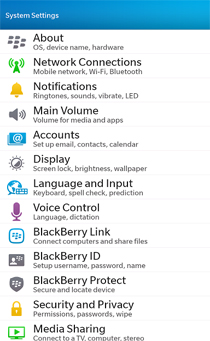
| System Settings |
| Step 1. From the Home screen, Open Settings, then select Accounts |
|
 |
|
|
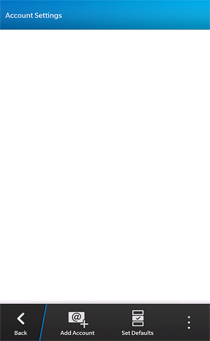
| Account Settings |
| Step 2. Select Add Account from Account Settings. |
|
 |
|
|
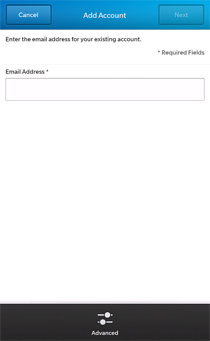
| Add Account |
| Step 3. Enter your full email address, and then select Advanced option from bottom of the screen. |
|
 |
|
|
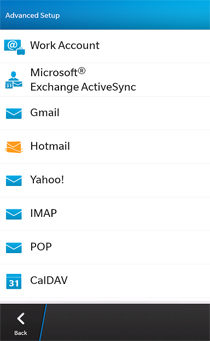
| Advance Setup |
Step 4. From Advanced Setup, please select IMAP option.
|
|
 |
|
|
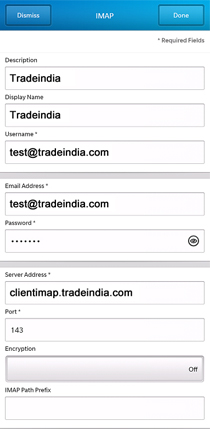
| IMAP Settings |
Step 5. Enter the following information for E-mail Accounts:
|
| Description: You can Enter your name or company name for account identification.
Display Name : Enter the name want your e-mail to display when someone receives your message.
Username: Enter your complete e-mail address, for example test@tradeindia.com
Email Address: Enter your complete e-mail address, for example test@tradeindia.com
Password: Enter your email password
Server Address : Enter incoming server address as clientimap.tradeindia.com
Port : 143
Encryption : Off, then scroll down the screen. |
|
 |
|
|
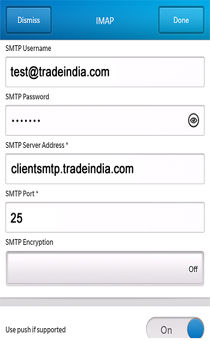
| IMAP Settings ( Countinued...) |
SMTP Username: Enter your complete e-mail address, for example test@tradeindia.com
SMTP Username: Enter your email password
SMTP Server Address: Enter Outgoing mail server address as clientsmtp.tradeindia.com
SMTP Port : 25
SMTP Encryption : Off
After Entering above information, please click Done option at the top of the IMAP screen. And now you are ready to receive and send mails.
|
|
 |
|
|
The above instructions are specially for BlackBerry Z-10 Model, however further support can be found on the BlackBerry support site.
http://uk.blackberry.com/support/apps-and-software/email-setup-and-integration.html
Please Note: If you require further support, please contact your mobile service provider in regards to adding POP3/IMAP account on your BlackBerry handset. |

 07971190770